Additional Information
SkyView supports two SV-AP-PANELS. Use with
SV-KNOB-PANEL Match with the knob control panel which has dedicated knobs for Altimeter Setting (Baro), HDG/TRK bug, and ALT bug.
BUILT-IN TRIM CONTROLLER
It doesn't stop there. The Autopilot module is also a full featured dual-axis trim controller. It can control your electric pitch and/or roll trim motors, replacing any relay decks that may be in the plane. It also has the ability to slow down the speed of trim as you fly faster so that your trim sensitivity is the same at all airspeeds ("speed scheduling" in jet-speak). More than a simple two speed controller, this feature is fully proportional and can be easily adjusted right in the SkyView setup menus.
AUTOPILOT AUTO-TRIM
The SkyView Autopilot can automatically keep the the aircraft in trim while under autopilot control, eliminating the need for the pilot to manually actuate their trim to satisfy the Autopilot’s built-in trim advice. This feature requires that the aircraft has an SV-AP-PANEL and is using its integrated trim controller for electric trim servo actuation. Auto-Trim can be configured on pitch and/or roll axes.
TRIM CONTROLLER SAFETY FEATURES
Controlling trim in your aircraft is serious, and Dynon takes safety here to the next level. The trim controller works even if SkyView is offline, with redundant power inputs. Trim is protected from running away due to stuck buttons, the outputs are protected from shorts, the pilot has priority over co-pilot inputs, and unlike competing systems, the loss of an autopilot servo does not also incapacitate the trim controller. Use of the trim controller is optional.
When using the SV-AP-PANEL, SkyView's Autopilot can also keep the the aircraft in trim while under autopilot control, eliminating the need for the pilot to manually actuate their trim to satisfy the Autopilot’s built-in trim advice. This feature requires that the aircraft has an SV-AP-PANEL and is using its integrated trim controller for electric trim servo actuation.
MORE FEATURES
- AP on-off
- Flight Director on-off
- HDG hold
- TRK hold
- ALT hold
- VS hold
- IAS hold
- Nose up-down control for vertical modes
- VNAV control, approache sequencing
- TRIM:
- Allows two set of trim buttons
- Auto airspeed sensitive trim speed control
- Autopilot Auto-Trim (when the SV-AP-PANEL is used as the airplanes's trim controller)
Pilot Interface
The optional SkyView Autopilot integrates with SkyView HDX to provide you with automated control of your airplane in the pitch and roll axes. This means that you can command the autopilot to follow your pre-defined flightplan, fly direct-to a waypoint, VOR, or airport, and turn to and maintain the heading or track of your preference. The autopilot will also climb or descend to and maintain the altitude of your choice using either vertical speed or airspeed to control the climb and descent rate. The autopilot will fly any instrument precision approach or non-precision approach when your aircraft is equipped with a compatible third-party IFR navigation device.
Yaw control is also available for select aircraft in the form of a yaw damper. The SkyView autopilot yaw damper will counter the effects of yaw instability by maintaining a centered slip/skid indicator. Minor yaw instability often reveals itself during turbulence. Some airplanes will generate lateral G oscillations (tail-wag) when turbulence is encountered. The result is an uncomfortable ride that can contribute to airsickness of sensitive passengers. Some airplanes generate opposing yaw when rolling into a turn, which requires the coordinated application of rudder to keep the slip/skid indicator centered. If your airplane has this adverse yaw tendency, the yaw damper will aid the autopilot during heading changes by applying the necessary rudder to maintain a coordinated turn. If your airplane experiences either of these two conditions, ride comfort and autopilot performance will be improved if you install the yaw damper with your autopilot.
Autopilot Menu
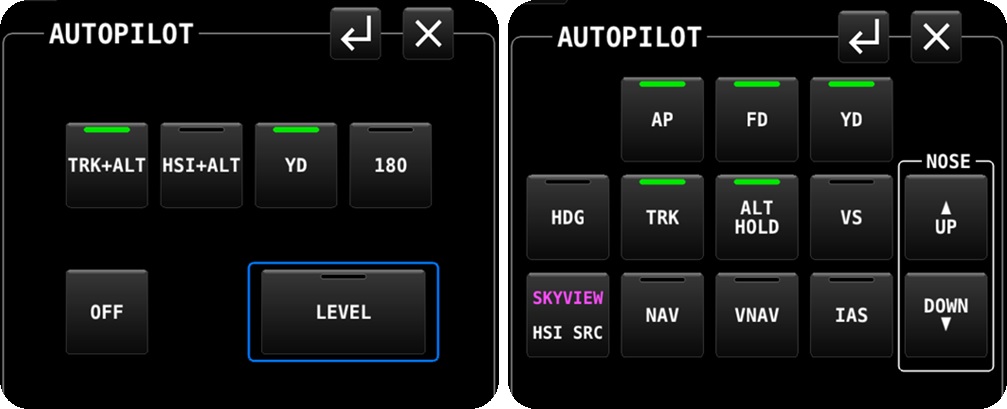
Simplified (left) and Expert (right) Autopilot Control Menus
The standard SkyView autopilot interface is the on-screen control menus which is available in two versions- Expert and Simplified. The on screen control menu can be accessed by simply touching the AP Status Bar which is always displayed on the Primary Flight Display (PFD). These control panels are selectable using the setup menu in the SkyView display.
Expert Control Menu
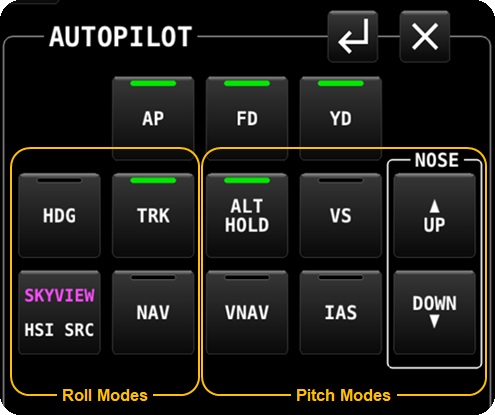
Expert Autopilot Control Menu
The expert control menu provides access to all of the autopilot’s control modes including the modes necessary for flying an IFR approach.
The control menu has two or three buttons across the top, depending on whether the yaw damper has been installed or not. The button marked AP engages the autopilot. The button marked FD will turn on the Flight Director when flying manually with the autopilot not engaged (the flight director turns on automatically when the autopilot is engaged). The third button, if installed, will engage the Yaw Damper. The green indicators on each button provide the status for each system.
Below the top row of buttons are where the various control modes are located. These buttons divide as shown below into the roll and pitch modes.
The Roll modes include HDG (heading), TRK (track), NAV (navigation) and HSI SRC (Horizontal Situation Indicator Source Selector).
The Pitch modes consist of ALT HOLD (altitude hold), VS (vertical speed) VNAV (vertical navigation, and IAS (indicated airspeed). VS and IAS both have pilot selectable values associated. VS mode is expressed in the rate of feet per minute the pilot desires to climb or descend. IAS mode simply selects the current speed the airplane is traveling at, and maintains this speed while climbing or descending. The nose up and nose down button allows the pilot to increase or decrease the vertical control mode value, which could be vertical speed or the airplane's indicated airspeed, depending on the selected mode. VNAV mode either arms or engages the approach mode with vertical guidance that has been selected for the desired approach.
.
Simplified Control Menu
The simplified control menu is ideal for VFR pilots that desire a simplified control scheme. By combining separate control modes into a common control function, It still permits full two-axis control of the aircraft, but forgoes some mode choices and capabilities that are often used in more complex IFR operations.
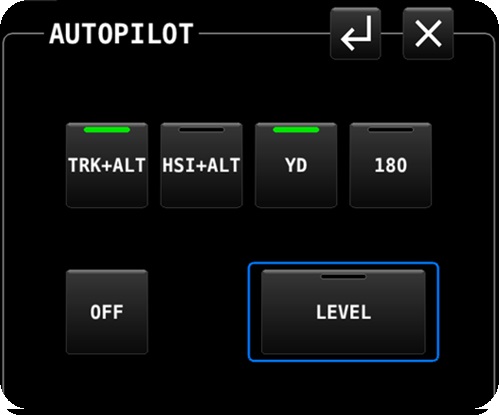
Simplified Autopilot Control Menu
TRK+ALT Control Function
Pressing TRK+ALT commands the autopilot to maintain the selected ground track while maintaining the current altitude. In other words, the selected track and altitude bugs will automatically set to the current track and altitude. With this function engaged, you may then change the direction of flight by changing the selected track value, and the autopilot immediately begins following your change command until it captures the new selected track.
Similarly, selecting a new altitude target using the altitude selector knob will cause the autopilot to begin a climb or a descent, depending, at a configured default vertical speed. Then the autopilot will capture and maintain the selected target altitude.
HSI+ALT Control Function
The primary difference between HSI+ALT and TRK+ALT, is that HSI+ALT will follow the HSI steering guidance from the selected navigation source connected to the HSI, such as a SkyView’s internal VFR navigator.
If this function is activated without being on the flight planned course, the HSI needle will not be centered. The autopilot will steer the airplane to an intercepting course, and maintain this course until it nearly centers the HSI needle, when it will steer to the planned course and follow it.
180 Control Function
When the 180 button is pushed, the autopilot automatically selects the reciprocal of the current heading and begins turning to capture the new selected heading by making a 180 degree turn. This safety feature can be useful for reversing course when inadvertently entering conditions of limited visibility.
Level Control Function
Pressing the Level button (or Straight and Level Mode) will immediately command the autopilot to pitch the airplane to zero vertical speed and roll it to zero degrees of bank. It will not attempt to fly the airplane to any previous altitude, heading or track, and it will not respect any bug inputs. It will maintain the level pitch and bank attitudes, on the heading and altitude at which it recovered to. When activated, Level Mode will engage the Autopilot if it was not already engaged.
OFF Mode
Selecting the OFF button disengages all autopilot functions except the Yaw Damper (if installed), allowing the pilot to takeover manual control.
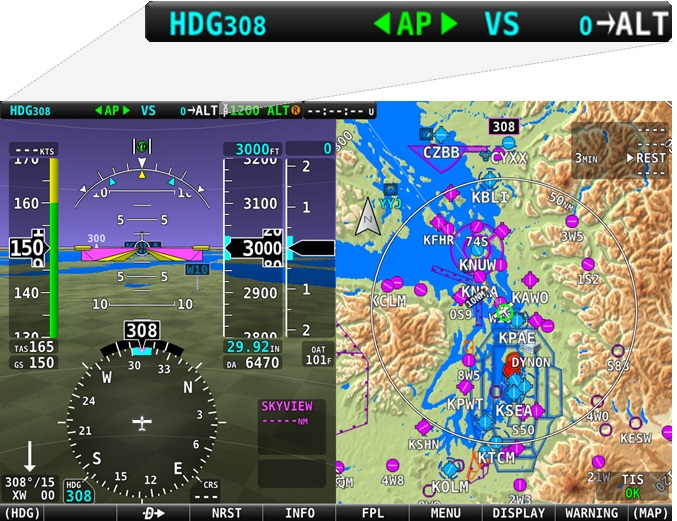
AP Status Indication
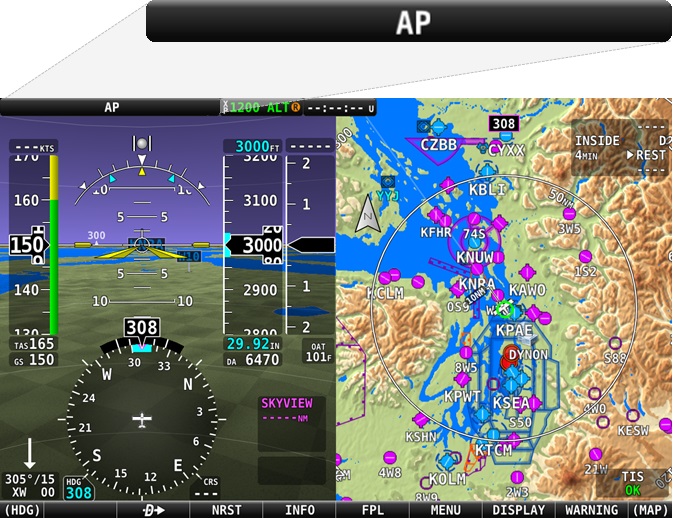
AP Status Bar indicating that the autopilot is not engaged
When the autopilot is engaged, one of the pilot’s tasks is to monitor the autopilot system. To monitor the system, the pilot needs to understand the autopilot's status at all times. To accomplish this, the SkyView display provides the autopilots status continuously via the AP Status bar located on the top left of the Primary Flight Display.
When the autopilot is not engaged, the autopilot status will be empty with the letters AP displayed in white:
AP Status Bar indicating that the autopilot is engaged
When the autopilot is engaged, the AP Status Bar will provide all of the autopilot status information:
The autopilot status bar is divided into three zones, roll status to the left, autopilot engagement status in the center, and pitch status on the right. When the autopilot is engaged, the AP letters will be displayed in green. Because the roll and pitch modes can be engaged separately, green arrows will also appear to indicate the engaged mode- roll, pitch, or both, as shown below. White pitch or roll status represents armed modes. Armed modes are modes that will automatically engage when certain parameters are met.
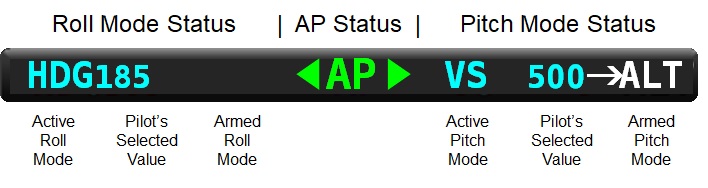
AP Status Bar Information Zones
In the roll status area, the roll mode selected by the pilot is displayed, along with the pilot selected value associated with that mode. In the depicted case above, the pilot has selected heading (HDG) mode, which means the autopilot will steer the airplane by turning to and maintaining the heading selected by the pilot, in this case 185 degrees magnetic. The roll status may include an armed mode that the autopilot will transition to automatically when a selected target has been reached. In this case, no modes are armed.
The pitch status appears on the right hand side of the autopilot status bar. This area displays the selected pitch mode and the pilot selected value. In this case, vertical speed has been selected as the pitch mode, and 500 feet per minute has been selected as the value. The pitch status may include the armed mode that the autopilot will transition to automatically when a selected target has been reached. In the example, the armed pitch mode is ALT (altitude hold).
The figure below represents examples of the forms of status that can be displayed on the Autopilot Status Bar.
| INDICATION |
DISPLAY |
MEANING |
 |
AP is white and no other indications are shown. |
Autopilot is OFF.
The Flight Director is OFF. |
 |
AP is white. The lateral and vertical modes and pilot-set values are cyan. |
Autopilot is OFF.
Flight Director is ON with HDG and ALT modes active. |
 |
AP is green and vertical mode pointer is green, vertical mode, and pilot-set values are cyan. |
Autopilot is ON. Flight Director is ON. Altitude Hold mode is engaged. No lateral modes are engaged. |
 |
AP and both lateral and vertical pointers are green. The lateral and vertical modes, and associated pilot-set values are cyan. |
The autopilot is ON. The Flight Director is ON. The lateral mode is heading, the vertical mode is altitude hold. |
 |
AP and both lateral and vertical arrows are green, the lateral and vertical modes, and associated pilot-set values are cyan. The Green vertical arrow is scrolling up or down. |
Autopilot is ON Flight Director is ON. The lateral mode is heading, the vertical mode is altitude hold. Auto-trim is commanding a pitch trem adjustment. |
 |
AP and both lateral and vertical arrows are green, the lateral and vertical modes, and associated pilot-set values are cyan. Armed vertical mode is white with white arrow. |
Autopilot is ON. Flight Director is ON. Lateral mode is heading, vertical mode is vertical speed. Altitude capture and hold mode is armed for future automatic engagement. |
 |
AP and both lateral and vertical arrows are green, the lateral mode and associated pilot-set value is cyan. The vertical mode and associated pilot-set value alternate between cyan-on-black background, and black-on-cyan background (flashing). |
Autopilot is ON. Flight Director is ON. Lateral mode is heading, vertical mode has automatically transitioned to altitude capture and hold mode. Lateral and vertical modes and the pilot-set values will flash for 10 seconds during an automated mode transition from armed to active. |
Yaw Damper Control

Yaw Damper Status Indicator
The Yaw Damper, if installed, may be engaged independently from the autopilot and can be engaged when the autopilot is not. The Yaw Damper on/off control resides on the autopilot control menu, or the optional Yaw Damper toggle button may be installed.
To independently engage the Yaw Damper, select the YD button on the autopilot control menu. The YD button light will turn green when engaged, and the Slip/Skid Indicator will appear green, with the letters YD in black. To disengage the Yaw Damper, toggle the YD button on the autopilot control menu to off. The green YD button light will extinguish.
Yaw Damper status is also provided on the PFD. The Slip/Skid Indicator (Ball) will change its appearance when the Yaw Damper is engaged from white to green, with the letters YD, as shown in the figure below.
Autopilot Flight Director
Autopilot control mode guidance can be used to fly manually by following the targets calculated by the autopilot without engaging the servos. The targets are provided visually on the PFD by the Flight Director. The autopilot enforced limits on Airspeed and G are honored by the Flight Director. For example, if a descent rate is selected that reaches the maximum autopilot operation speed the flight director will indicate a pitch up to reduce speed and limit descent rate.
To fly manually with the flight director on, configure the autopilot control menu as described above, but instead of pushing the AP button, push the FD button instead. The flight director will immediately begin to move in the configured manner, and you will need to maneuver the airplane to match the flight director ques displayed on the PFD.
SkyView provides three selectable flight director styles to choose from.
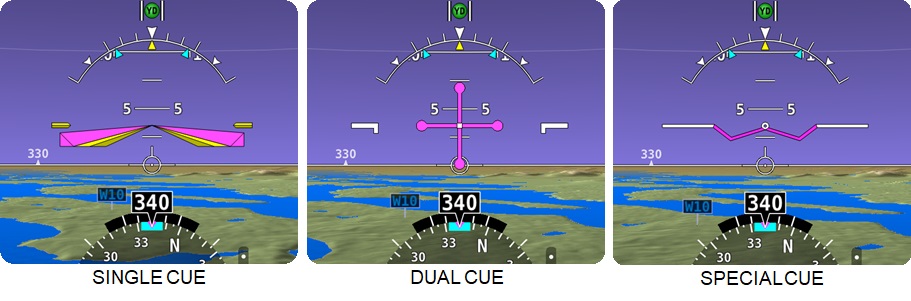
SkyView Flight Director Styles
Instrument Panel-Mounted Controls
While the SkyView display’s autopilot control menu, along with the display’s knobs can be used to operate the autopilot, an assortment of optional instrument panel-mounted controls are also available that provide direct-button access to the autopilot modes and functions.
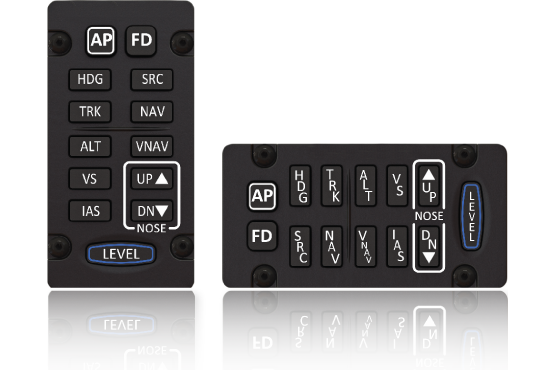
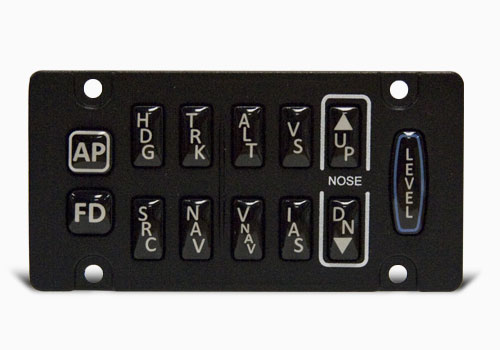
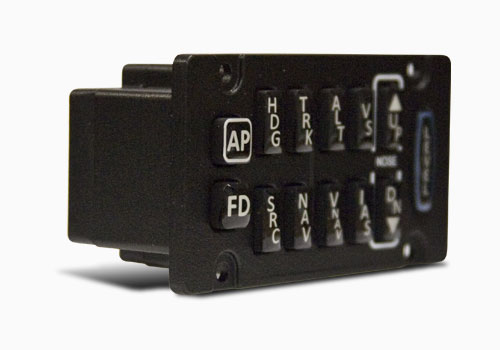
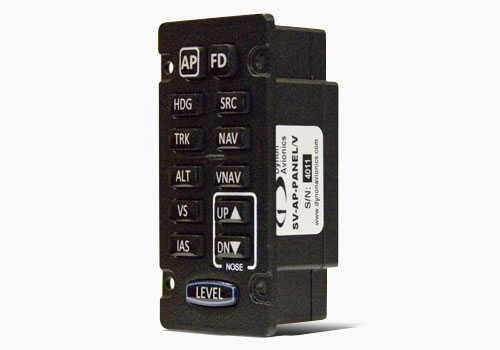
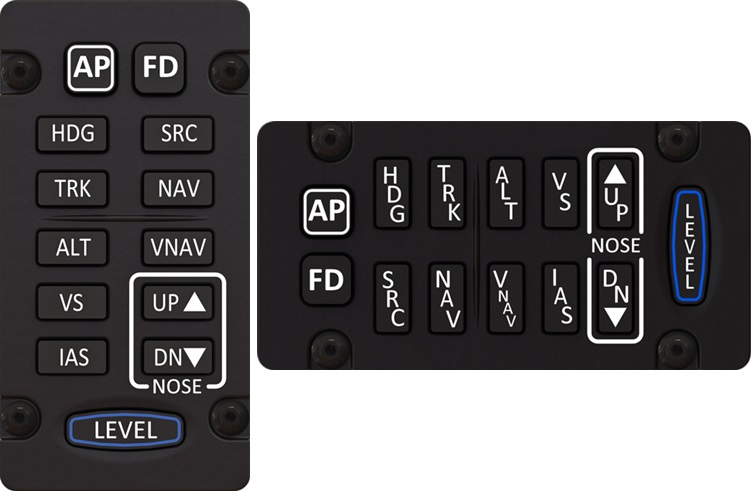
Autopilot Control Panel
The
Autopilot Control Panel is available in both horizontal and vertical layouts. These dedicated control panels provide the same controls as the expert control menu described above, with the exception of the added Level button. The benefits of the autopilot control panels is that it provides direct-button access to all of the autopilot's control modes. The pilot does not need to open the autopilot menu on the display to control the autopilot.
The autopilot control panel also provides Auto-Trim. The autopilot control panel includes a trim system controller, which is intended to allow the autopilot to automate the use of your electric pitch and roll trim systems, should your airplane be equipped. Auto-trim is not required, but it is very nice to have, as the autopilot will always keep the airplane in trim. Without Auto-trim, the pilot will simply respond to trim input commands displayed on the PFD by applying trim manually.
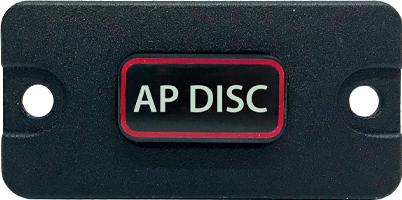
Autopilot Disconnect Button
The
Autopilot Disconnect Button is a panel-mounted button that's purpose is to immediately disengage the Autopilot. It is recommended that a button be mounted to the control yoke or stick to be used to disconnect the Autopilot. If this is not possible, the Autopilot Disconnect Button can perform this function. At least one Autopilot disconnect button of some form should be installed.
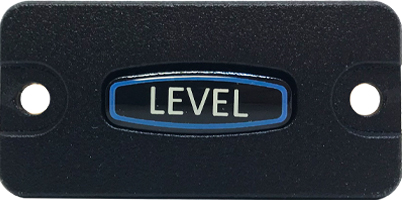
Autopilot Level Button
The
Autopilot Level Button is a panel-mounted button that's purpose is to activate/deactivate the autopilots Straight and Level Mode in the event of an airplane upset condition.
Pressing the Level button (or Straight and Level Mode) will immediately command the autopilot to pitch the airplane to zero vertical speed and roll it to zero degrees of bank. It will not attempt to fly the airplane to any previous altitude, heading or track, and it will not respect any bug inputs. It will maintain the level pitch and bank attitudes, on the heading and altitude at which it recovered to. When activated, Level Mode will engage the Autopilot if it was not already engaged.
Note that the autopilot control panel includes a level button. Locating this button in the co-pilot position however, adds an additional level of safety. While the primary purpose of this safety feature is to aid the pilot’s recovery from an unusual attitude should the pilot lose the visual horizon and become confused. The Level button may also be used by the person seated in the right seat to quickly engage the autopilot should the pilot be incapacitated.
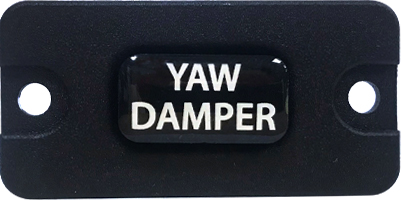
Yaw Damper Button
The
Yaw Damper Button is a panel-mounted button that's purpose is to activate/deactivate the Yaw Damper without the need to open the autopilot control menu in SkyView.
Knob Control Panel
The
Knob Control Panel is a helpful aid for using the autopilot, as it gives the pilot direct access to the bugs that you adjust the most while flying behind an autopilot. These knobs allow you to easily select the desired heading (HDG) or Track (TRK) that you desire the autopilot to fly, as well as the altitude (ALT) you want the autopilot to level off at, and maintain. The third knob, BARO, lets you directly adjust the barometer setting just as you would on a mechanical pressure-sensitive altimeter.
This panel is optional. All of these functions are adjustable by using one of the two knobs on the display. Many pilots find having dedicated controls to be a significant workload reducer.
Safety Features
The SkyView autopilot has many features designed to protect the airplane and the pilot.
Flight Envelope Protection
SkyView’s Autopilot system provides a number of safety features to protect the airplane and pilot from any system faults or failures, and some pilot operation errors. The Autopilot automatically protects the aircraft envelope while the autopilot is engaged. The autopilot will not, however, self-engage to protect the aircraft envelope while flying manually. The list of the SkyView autopilot protective features are described below.
G Limit Protection
- Prevents the total vertical aircraft acceleration from exceeding -0 and +2 Gs.
- Temporarily overrides all vertical axis control modes as long as the G limit is exceeded.
Airspeed Protection
- Limits the maximum airspeed to: VNE - 5%. The VNE value is configurable for your airplane.
- Limits the minimum airspeed to: VS0 + 30%. The VS0 value is configurable for your airplane.
- Overrides all vertical axis modes except G limit for as long as the above conditions are exceeded.
- Prevents autopilot from being engaged outside of the minimum and maximum control speeds.
Bank Limit Protection
- Control inputs will not exceed 35° or a lower maximum that is configured by the installer during system installation.
Take Off Protection
- Autopilot automatically disengages if the autopilot is already engaged as airspeed comes alive (~20 kts) to prevent the airplane from taking off with the autopilot engaged. This allows the autopilot to be engaged on the ground for operation testing and maintenance.
Mode Fail-Down
- Autopilot will fail down to a less complex mode if the current or requested function is no longer possible.
- Prevents autopilot from disconnecting when data from an external source is lost.
- When such a fail-down occurs, the autopilot mode flashes and is replaced with the new mode. A visual and audio cue is generated for such mode changes.
| Engaged Mode |
Primary Fail-Down Mode |
Secondary Fail-Down Mode |
| NAV |
TRK |
HDG |
| TRK |
HDG |
Autopilot Disconnects |
| HDG |
TRK |
Autopilot Disconnects |
| IAS |
ALT |
Autopilot Disconnects |
| VNAV |
ALT |
Autopilot Disconnects |
| VS |
Autopilot Disconnects |
Not Applicable |
| ALT |
Autopilot Disconnects |
Not Applicable |
Servo Break-Away
- Each Autopilot servo has a shear-screw that will break-away when applied force to the control reaches a maximum value.
- The shear-screw provides protection should the servo become jammed and prevent the flight control system from moving.
- The pilot must overcome the servo break-away force if a flight control fails to move as expected and is jammed by the autopilot servo. Breaking the shear-screw frees the flight controls from the affected servo.
Autopilot Alert Annunciations
The autopilot will provide both visual and aural alerts designed to both attract your attention, and inform you with the required action you must take to preserve the autopilot’s performance.
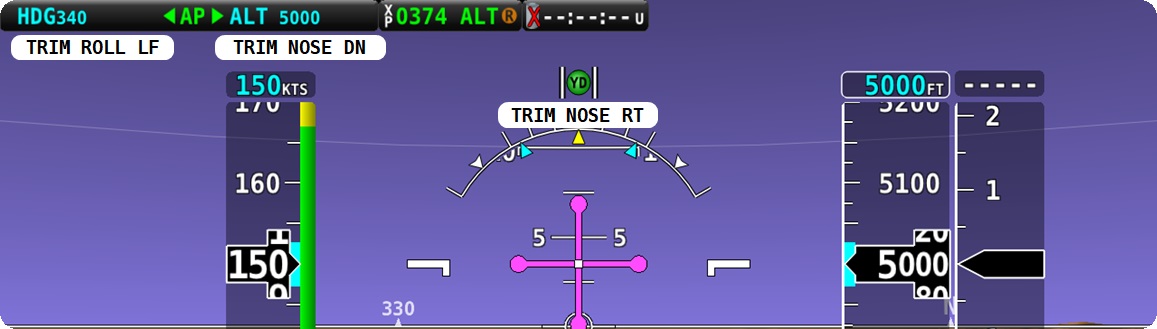
Airplane Trim Alerts
Trim alerts are displayed on the PFD in airplanes with manual trim systems when the autopilot detects loads acting upon it. These alerts indicate to the pilot that trim adjustment is necessary. After being displayed for 10 seconds, an aural will annunciate to attract your attention. Your response should be to adjust the trim in the direction indicated in the alert until the alert is removed.
Trim Alert Examples
Servo Slip Alerts
Servo Slip alerts display on the PFD whenever a servo is unable to move the controls in the direction commanded by the autopilot. Servo slips are expected from time to time, and are not the same as breaking the shear screw as previously described. Servo Slip alerts are generally transient and usually occur when control loads are increased by:
- Turbulent air.
- The pilot overriding the flight controls.
- Significant Out-of-trim condition for the affected control.
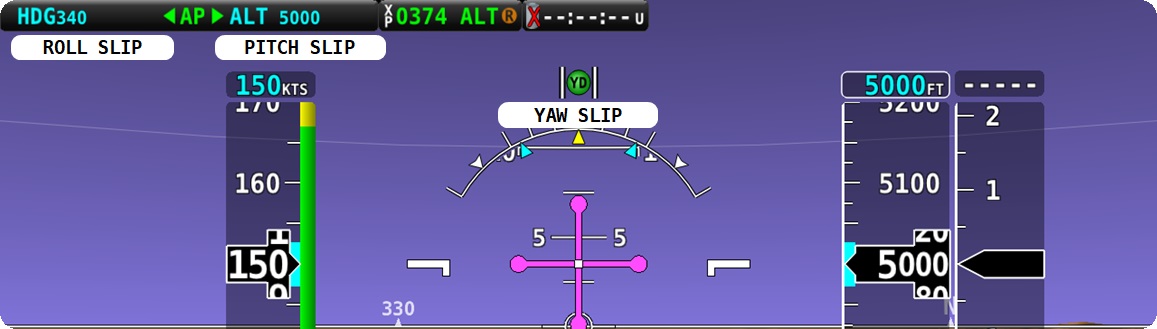
Roll, Pitch, and Yaw Slip Alert Examples
Slip+Trim Alerts
When the autopilot carries a large trim load for an extended period, the affected servo may begin to slip. When this occurs, the Autopilot triggers slip and trim alerts together. If the alert persists, the aircraft is likely severely out of trim. In this situation disconnect the autopilot, trim the aircraft appropriately, and then re-engage the autopilot.

Slip Trim Alert Example
Airspeed Alerts
When the airplane reaches the minimum or maximum limit speeds configured in the autopilot, the autopilot will pitch the nose up or down as required to prevent the airplane from exceeding these limit speeds. Whenever this protective feature is active, the autopilot alerts you by displaying the visual alert. If action does not occur in 10 seconds, an aural will annunciate to attract your attention.

Airspeed High/Low Alert Example
Level Button
Pressing the
Level Button (or Straight and Level Mode) will immediately command the autopilot to pitch the airplane to zero vertical speed and roll it to zero degrees of bank. It will not attempt to fly the airplane to any previous altitude, heading or track, and it will not respect any bug inputs. It will maintain the level pitch and bank attitudes, on the heading and altitude at which it recovered to. When activated, Level Mode will engage the Autopilot if it was not already engaged.
The primary purpose of this safety feature is to aid the pilot’s recovery from an unusual attitude should the pilot lose the visual horizon and become confused. It may also be used to quickly turn the autopilot on to have the autopilot momentarily take over when you’re otherwise hand-flying the aircraft.
Operating Modes
The autopilot uses control modes and in some cases, control functions, to accomplish certain kinds of automated tasks. The pilot chooses the mode or function that matches what the pilot wants to accomplish. The roll modes maneuver the airplane left and right, laterally across the ground. The vertical control modes maneuver the airplane vertically, to change an altitude by climbing or descending, as well as maintain a selected altitude.
LEVEL (Straight and Level) Function
Pressing the Level button (or Straight and Level Mode) will immediately command the autopilot to pitch the airplane to zero vertical speed and roll it to zero degrees of bank. It will not attempt to fly the airplane to any previous altitude, heading or track, and it will not respect any bug inputs. It will maintain the level pitch and bank attitudes, on the heading and altitude at which it recovered to. When activated, Level Mode will engage the Autopilot if it was not already engaged.
The primary purpose of this safety feature is to aid the pilot’s recovery from an unusual attitude should the pilot lose the visual horizon and become confused. It may also be used to quickly turn the autopilot on to have the autopilot momentarily take over when you’re otherwise hand-flying the aircraft.
HDG (Heading Hold) Mode
When the HDG button is pushed, and the pilot has selected a heading, the autopilot will turn the airplane in the shortest angular direction to reach the selected heading. The autopilot will capture the selected heading by decreasing the turn rate to zero as it rolls out onto the selected heading. The autopilot will maintain this heading until commanded otherwise. If a heading has not been selected when heading mode is engaged, the system will default to maintaining the current heading. When this occurs, the pilot may then change the selected heading using the heading selector, and the autopilot will turn toward and capture the new selected heading.
TRK (Track Hold) Mode
When the TRK button is pushed, and the pilot has selected a track, the autopilot will turn the airplane in the shortest angular direction to reach the selected track. The autopilot will capture the selected track by decreasing the turn rate to zero as it rolls out onto the selected track. The autopilot will maintain this track until commanded otherwise. If a track has not been selected when heading mode is engaged, the system will default to maintaining the current track. When this occurs, the pilot may then change the selected track using the track selector, and the autopilot will turn toward and capture the new selected ground track.
ROLL (Roll Hold) Mode
The roll hold mode will automatically activate when the autopilot is engaged with no roll modes selected in advance.The autopilot will hold the current bank angle, or the maximum bank angle limit, whichever is smaller, until commanded otherwise.
NAV (Navigation) Mode
The autopilot follows the pilot selected navigation guidance as depicted on the HSI. This can be SkyView’s flight plan or guidance from connected third-party sources, such as a NAV radio or IFR GPS Navigator.
VS (Vertical Speed) Mode
The autopilot will climb or descend while maintaining the selected vertical speed (aircraft performance permitting) and shall do so until commanded otherwise. If a target altitude has been selected, the autopilot will reduce the vertical speed to zero to stop the climb or descent on the selected altitude. Upon capturing the altitude, the autopilot automatically changes to ALT mode to maintain the altitude.
IAS (Indicated Airspeed) Mode
The autopilot will climb or descend while maintaining the selected airspeed, providing the pilot increases or decreases power. The autopilot will control the airplane's speed with the elevator, and shall do so until commanded otherwise, aircraft performance permitting. If a target altitude has been selected, the autopilot will reduce the vertical speed to zero to stop the climb or descent on the selected altitude. Upon capturing the altitude, the autopilot automatically changes to ALT mode to maintain the altitude.
ALT (Altitude Hold) Mode
The autopilot will maintain the pilot selected altitude. This may be the captured altitude after a climb or descent, or the current altitude at which the mode is engaged.
VNAV (Vertical Navigation) Mode
The autopilot will capture and track the glideslope or glidepath of the chosen approach type down to the pilot selected Minimum Altitude, when the approach procedure requires the pilot to take manual action.
GA (Go Around) Function
The Go Around function can be activated by pressing the Nose Up button when the autopilot is engaged in vertical guidance such as a VNAV or GS approach. Pushing Nose Up switches the lateral mode to TRK, and vertical mode to the configured Go Around climb mode (either VS or IAS mode, depending on configuration.)


 Proudly built in the U.S.A.